UPDATED How To Fix: External Disk Drive Suddenly Became RAW
DISCLAIMER: These examples use techniques that I actually employ in the real world to deal with real problems. They might be wrong or dangerous. They might be inefficient. If you try them yourself, it might cause damage or irreparable loss. I take no responsibility for anything you do based on my examples or the information that I provide here.DID THIS POST HELP YOU RECOVER DATA ? Consider helping me by purchasing one of these inexpensive Autism Awareness products at Amazon…
Autism Awareness Car Magnets
Autism Awareness Bracelets
Thanks,
James
It has been well over a year since last updating my post on ‘Recovering an external hard drive that has suddenly become RAW’ and there have been some significant changes.
- PartedMagic is no longer free
- Hard drives larger than 500GB have become commonplace
- TestDisk has become even better
- Many many many comments from people have been posted that show common problems that are not directly addressed by the original post.
As with many similar situations in life the appropriate response is “Don’t panic”. When approached sensibly and carefully, the situation can be resolved and the data saved more times than not. Here we will look at the causes, fixes and preventative measures for instances involving external drives being used with Windows XP and Windows Vista/7/8.
Error Messages
Common error messages associated with the sudden inability to access an external hard disk drive. |
 |
| Windows XP | Windows 7 |
| DO NOT FORMAT THE DRIVE | |
When attempting to access the drive in Windows you may see a message asking you to format the drive DO NOT FORMAT THE DRIVE
You need to format the disk in drive before you can use it.

Do you want to format it?
Another error that you may see when trying to access the drive in Windows from a program or the command line is…
This volume does not contain a recognized file system. Please make sure
that all required file system drivers are loaded and that the volume is
not corrupted.
Attempting to run chkdsk in an attempt to repair the problem will give an error also…
chkdsk can not be run on the drive

The type of the file system is RAW.

CHKDSK is not available for RAW drives.
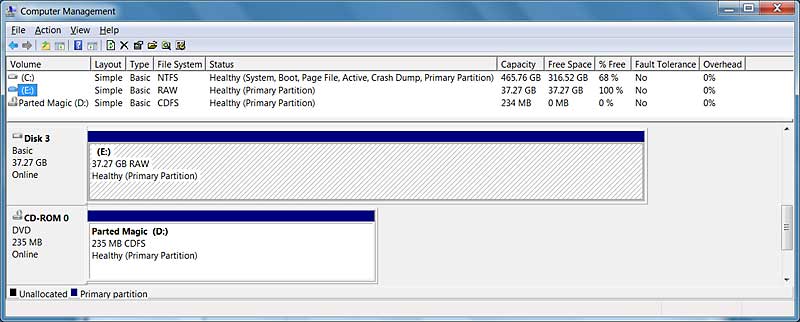
The Disk Management window shows the partition as either RAW or without a filesystem type.
| Properties of the drive show that both used and free spaces are 0 byte in size for the raw drive | |
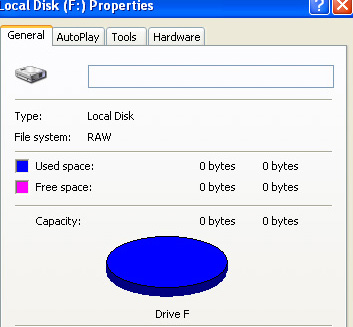 |
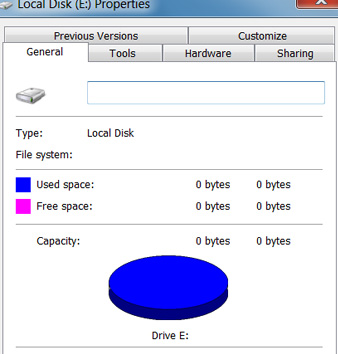 |
| Windows XP | Windows 7 |
What does RAW partition mean
A RAW filesystem simply means that it is a filesystem that is not recognized by Windows. Therefore all the available filesystem drivers are unable to mount the filesystem as a drive. This often happens when the records determining the filesystem type or location on the disk are damaged or corrupted, usually the partition table or the boot sector.Since Windows sees no filesystem in the partition, it prompts you to format it in order to create a filesystem on it. DO NOT FORMAT IT.
Why does it happen and how to avoid it
The most common cause of external hard drives suddenly becoming RAW drives is if they are disconnected from a computer without using the “Safely Remove Hardware” option. This can happen in many ways such as a power failure, unplugging the drive from the USB port or from its AC adapter, a problem with the computer that causes it to temporarily disconnect the USB hubs and many more circumstances can lead to this occurring.Always use “Safely remove hardware” to disconnect the drive. Left click the icon on the taskbar, select the device from the menu, and wait for the confirmation message.
How do you fix it
For this example, I chose the most heavily damaged disk with this issue that I could find in my collection of damaged disks. It has both of the most common problems. The partition table is corrupted and the boot sector of the main partition is also scrambled. The pictures of error messages above all came from this drive. The pictures of the repair process below are from the actual repair of this drive. Some images are from a virtual machine (simply to make it easier to get the screenshots) and some are from an actual desktop. This is a real repair not a manufactured example.Before proceeding beyond this point, you need to be aware of the risks involved. If the problem with the drive is not simply a logical error but is a manifestation of physical damage then the more you use it and try to repair, the worse the damage may become. To minimize the risks, the drive can be taken to a professional who is experienced in this type of repair. The drive should not be making strange clicking or beeping noises. That means that there is definitely physical damage and it should be sent to a facility with the proper tools and environment to repair/recover it since trying to repair it as described in this post can make that situation worse. If you wish to continue on your own there are three important rules to remember.
1. Computer problems are variable. You may very well come up with a different situation than I outline below. Make sure that you stop and think things through carefully when the process becomes different than I describe.
2. You DO NOT WANT TO WRITE ANYTHING TO THE RAW DRIVE except for the repaired MBR and repaired Boot Sector if necessary. Any other writing can overwrite data on the drive that you would want to keep.
3. This repair does not apply to solid-state drives (SSD). They are very different than normal drives and can erase important data on a RAW partition just by connecting power to them.
BEFORE PROCEEDING YOU MUST TRY TO DETERMINE IF THERE IS PHYSICAL DAMAGE
If there is physical damage, then consider sending the drive to a professional recovery service since physical damage often continues to degrade the data and simply powering on the drive may make data become irretrievable.
If there is physical damage, then consider sending the drive to a professional recovery service since physical damage often continues to degrade the data and simply powering on the drive may make data become irretrievable.
Accessing and Assessing a Hard Drive’s S.M.A.R.T. Data to Determine if There is Physical Damage
Being able to effectively analyze the S.M.A.R.T. data on a hard disk drive (HDD) enables you to quickly identify problems that can aid you in recovering all of the data from it before it becomes irretrievable or requires significant expense to retrieve.S.M.A.R.T. stands for Self-Monitoring, Analysis and Reporting Technology and is the hard drive’s record of its internal diagnostic monitoring and usage statistics packaged for being accessed externally. The primary purpose of S.M.A.R.T. is to alert us to an impending failure of the drive while there is still time to save the data. When a hard drive reports that the S.M.A.R.T. health is FAILED you must get the important data off of it immediately and not use the drive anymore.
IT IS IMPORTANT TO UNDERSTAND THAT DIFFERENT MANUFACTURERS AND DIFFERENT DRIVE MODELS CAN STORE AND DISPLAY DIFFERENT SUBSETS OF S.M.A.R.T. DATA AND CALCULATE VALUES AND TOLERANCES DIFFERENTLY.
S.M.A.R.T. data is best used as a general guide. For specifics, the hard drive’s technical documentation must be consulted. Sometimes that information is difficult to come by and can be proprietary. For example, the formulas for how some manufacturers calculate normalized values for attributes can be very difficult to find.
Wikipedia entry for S.M.A.R.T.
Proper analysis of S.M.A.R.T. data
- Can help determine if the problem is physical damage or just logical damage.
- With logical damage, the drive can be trusted and continue to be used after being repaired.
- With physical damage, you want to get any important data off of the drive and replace it.
- Helps you choose the best method for recovering all of the data from the drive.
- Prevents you from accidentally doing things that may make matters worse.
In order to check the S.M.A.R.T. data on a HDD
- The drive should not be making strange clicking or beeping noises. That means that there is definitely physical damage and it should be sent to a facility with the proper tools and environment to repair/recover it.
- The drive needs to be accessible by the computer’s BIOS during POST (responds to the ATA command IDENTFY_DEVICE). In other words, the drive should be visible in Windows.
- In the case of external drives connected via USB they need to be detected by the computer’s Plug and Play software (responds to the ATA command IDENTFY_DEVICE).
After making sure that the connection between the drive and the computer is correct and its quality is the best it can be, you need to check the health of the drive itself. Then you can rule out physical damage that requires repair with specialized tools in a controlled environment.
What We Are Looking For
·
Does the drive make noises that it did not make before?
o
Loud clicking or a periodic beeping sound may indicate mechanical
damage. Physical damage may require the drive to be sent to a facility with the
proper tools and equipment to recover the data.
·
Does S.M.A.R.T. show any errors or bad attribute values?
o
We look at the Raw Value of S.M.A.R.T.
attributes with ID#s 5, 191 and 197.
·
Does it pass the S.M.A.R.T. Short Self-Test?
o
We run the S.M.A.R.T.
Short Self-Test.
If it does not pass any of these tests, you need to take it to a data
recovery lab and have it professionally recovered otherwise you risk
making things worse.View S.M.A.R.T. data with GSmartControl
Get a copy of GSmartControl for Windowshttp://sourceforge.net/projects/gsmartcontrol/files/0.8.7/gsmartcontrol-0.8.7-win32.zip/download
Unzip it and run gsmartcontrol.exe
Double-click your drive and click the ATTRIBUTES tab.
- If ID #05 Reallocated Sectors Count is listed and has a RAW VALUE greater than 5 then there is physical damage in the form of bad sectors.
- If ID #191 G-sense Error Rate is listed and has a RAW VALUE greater than 0 then that means the drive has been dropped or bumped hard.
- If ID #197 Current Pending Sector Count is listed and has a RAW VALUE greater than 5 then there is physical damage in the form of bad sectors.
Repair partition table and boot sector
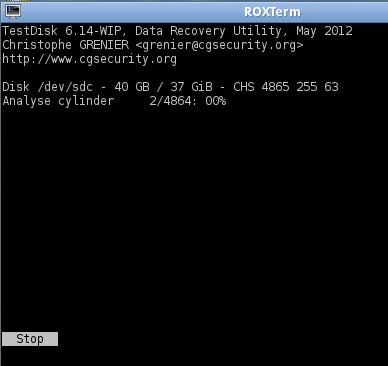
This can take many hours, even days, to run on large hard drives bigger than 500GB
When I first wrote this guide, 1TB drives were very rare. Now they are quite common. Be aware that this can take a very long time to run. You can do other stuff on your computer while it runs as long as it is not something that tries to use the bad drive.
If there is physical damage, then consider sending the drive to a professional recovery service since physical damage often continues to degrade the data and simply powering on the drive may make data become irretrievable.
If there is no indication of physical damage then you can continue.
In order to repair the most common problems that cause an external disk
to suddenly become RAW we will use TestDisk.When I first wrote this guide, 1TB drives were very rare. Now they are quite common. Be aware that this can take a very long time to run. You can do other stuff on your computer while it runs as long as it is not something that tries to use the bad drive.
If there is physical damage, then consider sending the drive to a professional recovery service since physical damage often continues to degrade the data and simply powering on the drive may make data become irretrievable.
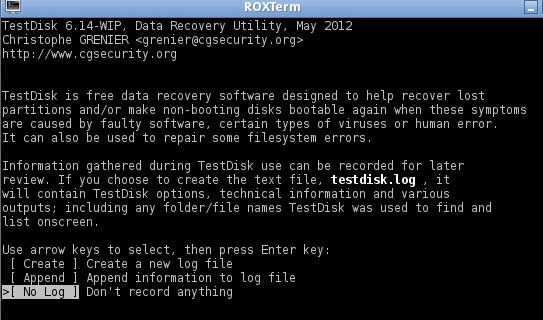
Download Testdisk
http://www.cgsecurity.org/testdisk-7.0-WIP.win.zip
and run testdisk_win.exe
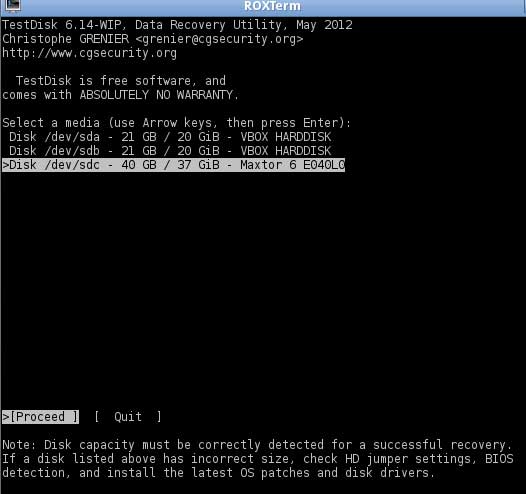
TestDisk is a console application so you have to use your keyboard to interact with it instead of your mouse.
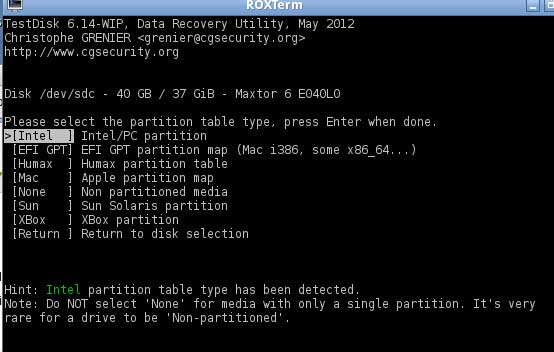
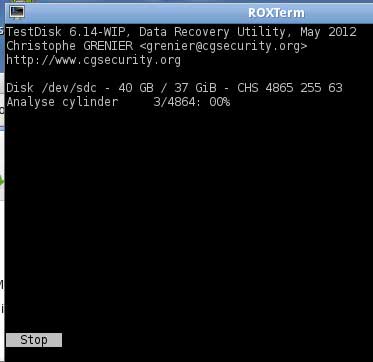
Choose CREATE and hit enter
Choose Proceed and hit enter

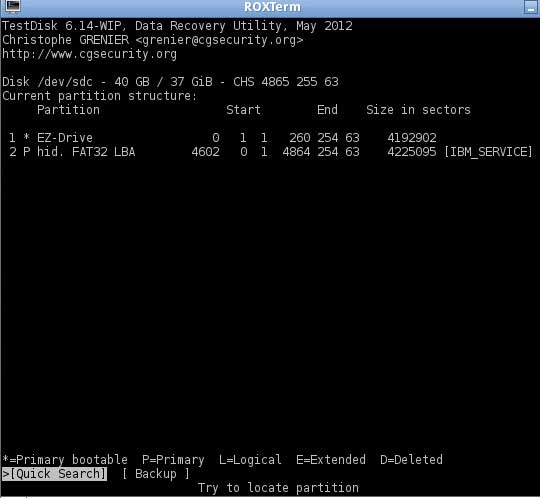
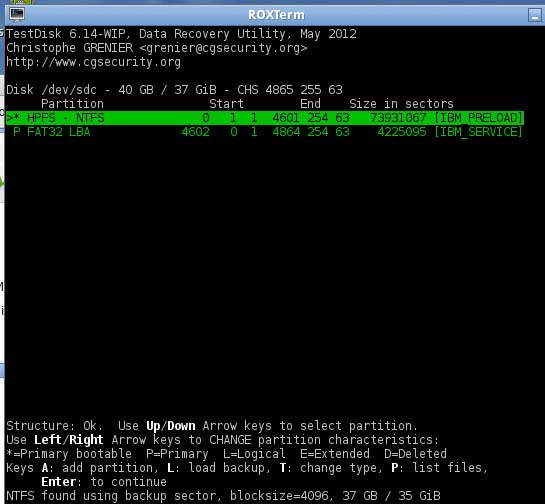
Select Quick Search and hit enter
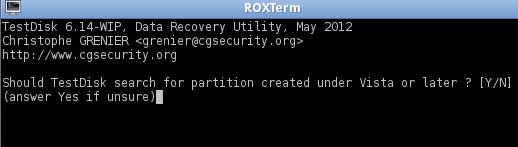
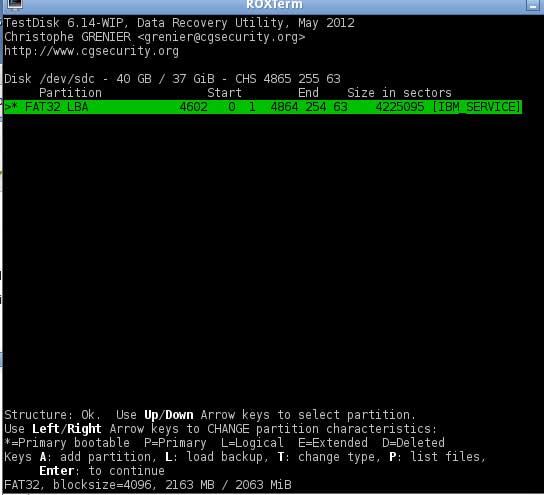
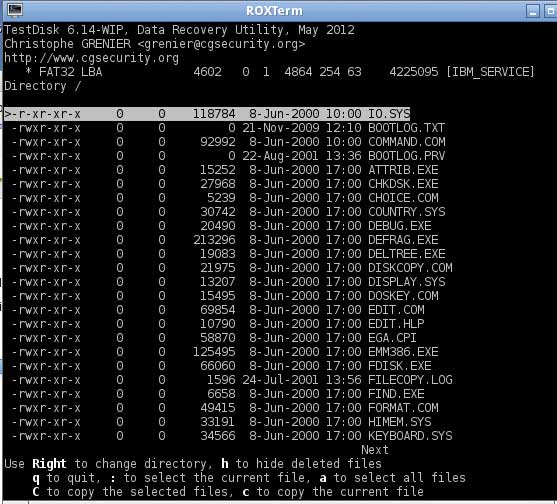
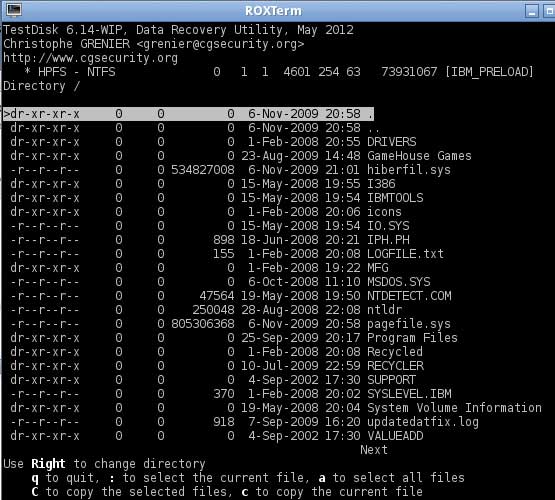
P
and you should see a list of files/folders in the partition.
Q
to go back a screen and then press
enter
IF YOU SEE ALL YOUR FILES THEN SKIP THE DEEPER SEARCH AND GO TO THE STEP DESCRIBING SELECTING WRITE
To get to this screen, select DEEPER SEARCH and press enter.

P
to see the files/folders and now we see the data we want to make visible again.
Q
to go back a screen and then press enter to get to this screen.
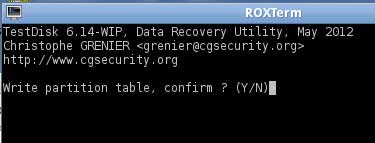
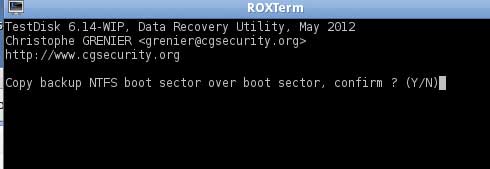
Select WRITE and press enter in order to write our new partition table to the drive.
DO NOT WRITE A NEW PARTITION TABLE IF YOU DID NOT SEE YOUR FILES/FOLDERS That means the proper partition table was not found and you will have to try a different technique to recover your data.
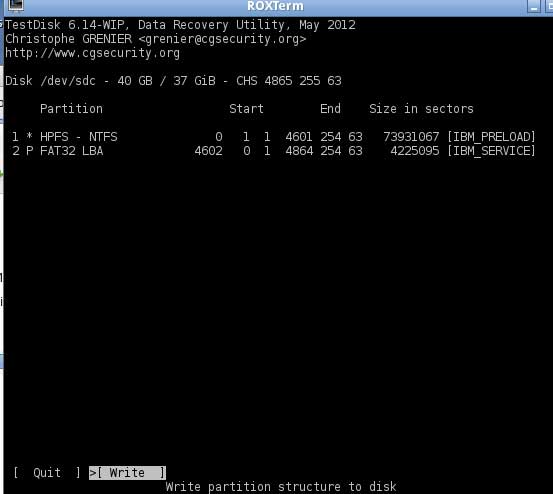

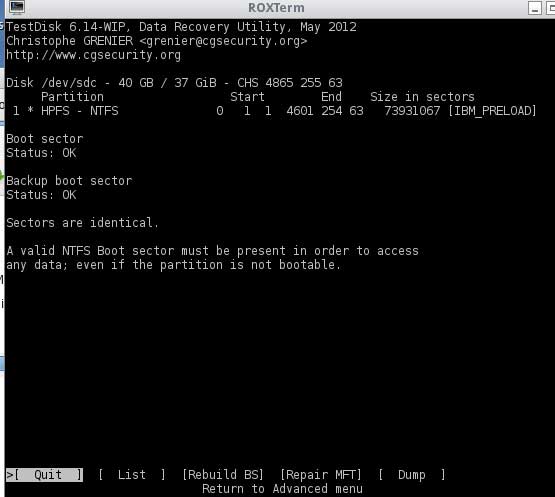
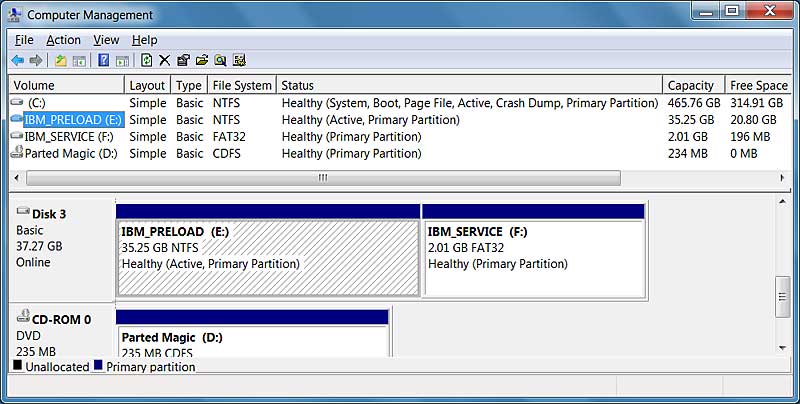
Here are the results for the drive used in this example…


Backup important files and run chkdsk
Now you should make backups of all important files on the drive in case it goes bad again and then run chkdsk to fix any other filesystem errors that may still exist.After backing up important files, right-click the disk in Windows Explorer and choose PROPERTIES. Go to the TOOLS tab and click CHECK NOW. Check both options and click START.
Hopefully, this solves your problem. Please feel free to contact me through the contact form or comments if you have any questions or suggestions for this post.
DID THIS POST HELP YOU RECOVER DATA ? Consider helping me by purchasing one of these inexpensive Autism Awareness products at Amazon…
Autism Awareness Car Magnets
Autism Awareness Bracelets
Thanks,
James
Credit to and Ref: http://html5.litten.com/updated-how-to-fix-external-disk-drive-suddenly-became-raw/
ေဒါင္းမရလို႔အခတ္အခဲရွိခဲ့ရင္ leave me message, love to hear ေနာ္
အားလံုးပဲ အဆင္ေျပၾကတာကိုပဲ ၾကားခ်င္ပါတယ္
က်ဳိကၡမီသားလင္းႏိုင္ဦး (နည္းပညာ)
http://linnaingookkm.blogspot.com/
အားလံုးပဲ အဆင္ေျပၾကတာကိုပဲ ၾကားခ်င္ပါတယ္
က်ဳိကၡမီသားလင္းႏိုင္ဦး (နည္းပညာ)
http://linnaingookkm.blogspot.com/

0 Comments
You are welcome to share your ideas with us in comments! (မှတ်ချက်များပေးရာတွင် သင်၏အကြံဉာဏ်များကို ကျွနိုပ်တို့နှင့် မျှဝေရန် ကြိုဆိုပါသည်။)
Emoji