In this post will use SuperSU made by Chainfire to gain root access on Android devices. Not only SuperSU can do Rooting against the Android Devices, but still much more to do, such as RootGenius, iRoot, KingRoot, MobileGo, Kingoroot, One Click Root, and SRSRoot, these tools are designed to perform several functions such as rooting, flash ROM, flash Kernel, Remove Ads in Apps, Booster Device, Uninstall Preinstalled Apps, Remove bloatware, Unlock Screen, Download ROM and others.
Some Tools at the top will require a PC to a place they walk, if you do not have a PC, you can do Rooting on your Android device without a PC, an application that you can use for rooting Without PC is KingRoot Mobile, 360Root Mobile, iRoot Mobile, RootGenius Mobile, Key Master Root, Kingoroot Mobile, TowelRoot, and FramaRoot.
All right, go straight to the point, namely Root Acer Liquid using SuperSU, follow the steps as below:
1. UNLOCK BOOTLOADER
Prerequisites:
MTK Preloader Drivers installed
ADB & Fastboot Drivers installed
Knowledge about ADB & Fastboot commands
Attention: Unlocking the bootloader will erase your personal data, images, applications etc from your smartphone device. So, take a backup of your personal data before following this tutorial.
- Download and install Acer USB Driver and MTK_Signed_Drivers.zip on your computer.
- Download and Install 15 Seconds ADB Installer on your computer.
- On your Acer Liquid Devices, Enable USB Debugging Mode and OEM Unlock.
- After that, connect Acer Liquid smartphone to your computer through USB Cable.
- Now, open Command Prompt on your computer.
- After that you will see a Command Prompt window appears and type the command: adb rebootbootloader
(The above command is used to enter Fastboot mode)
- After Acer Liquid device you're on the fastboot mode, now type the command: fastboot devices
(from the above command you will see a list of devices connected to the computer, If you can not find the list of devices in this step, check the USB Driver Acer and try to check the Device Manager in your computer)
- Now, give another command: fastboot oem unlock
- Validate on your phone the unlock using Volume button.
- After Unlock finished, now type the command: fastboot reboot
(The command will restart your device OS)
2. INSTALL TWRP AND ROOT
2. INSTALL TWRP AND ROOT
- Download and extract SP Flash Tool file on your computer.
- Download MT6735-Android-Scatter.txt file on your computer.
- Download Custom Recovery (TWRP ) on your computer and rename to recovery.
- Download UPDATE-SuperSU.zip file and place it on your Acer Liquid Z630 (T03) SDCard Memory (placed outside the folder).
- Then run the SP Flash Tool (flash_tool.exe) on your computer, then click on the "Scatter Loading" and navigate to the MT6735-Android-Scatter.txt file.
- Now, give check the checkbox "RECOVERY" and double-click on in the "Location" (row RECOVERY) then navigate to the file recovery.img.
- After that, click "Download".
- After that, turn off your Acer Liquid Z630 (T03) (pull the battery if necessary).
- Now connect your Acer Liquid Z630 (T03) to a computer using a USB cable.
- There will be a process of downloading the SP Flash Tool, Wait Process Download complete (make sure there is Green Check).
- If it is so, you can disconnect your Acer Liquid Z630 (T03) from the computer. (don't power on your device).
- After the entry into TWRP Recovery Mode by pressing the "Volome Down and Power" simultaneously.
- Release all buttons when the Acer Liquid Z630 (T03) screen flickers and in a few seconds the Recovery screen will appear. (Volume Down button for selecting, Volume Up button for OK).
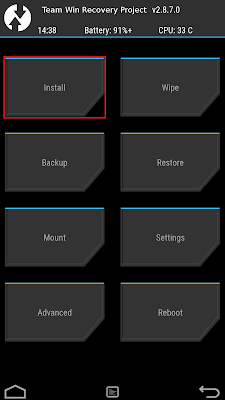
- Once you have booted into TWRP recovery mode, Press on Install and select the package UPDATE-SuperSU.zip who have moved to SDCard memory.
- Swipe to Confirm (form left to right) and you can see some process on the screen of your device.
- Now, reboot your device from TWRP recovery (Reboot System).
- If all is successful, you will now see the application SuperSU on the menu of your application.
http://forum.xda-developers.com/android/development/guide-firmwares-roms-cwm-root-acer-mtk-t2945933/post64001248#post64001248
http://forum.xda-developers.com/android/development/guide-firmwares-roms-cwm-root-acer-mtk-t2945933

ေတာင္းဆိုထားတဲ့ညီအကိုအတြက္ တင္ေပးလိုက္ပါၿပီ။
ဒီဖုန္းလည္း Bootloader ကိုအရင္ဦးအျမစ္ျဖဳတ္ေပးရပါမည္ ၿပီးေတာ့
Recvery ထည့္သြင္းၿပီးမွ SuperSu.zip ဖိုင္ျဖင့္ Root လုပ္ယူရမွာျဖစ္ပါတယ္။
လိုအပ္ခ်က္မ်ား
=========
MTK Preloader Drivers installed
ADB & Fastboot Drivers installed
Knowledge about ADB & Fastboot commands
How to Unlock bootloader
=================
Unlcok ျပဳလုပ္ရန္အတြက္ လိုအပ္တာမ်ားကိုေအာက္ကလင့္မွာရယူပါ
ADB and Fastboot ကို ၁၅ စကၠန္႔ Installer ကိုကြန္ပ်ဴတာတြင္
Install ျပဳလုပ္လုပ္ပါ ေအာက္ကလင့္မွာေလ့လာၾကည့္လိုက္ပါ
အေကာင္းဆံုး ADB and Fastboot ကို ၁၅ စကၠန္႔ျဖင့္ Install ျပဳလုပ္နည္း
လိုအပ္မယ္ဆိုရင္ ထပ္ၿပီးေလ့လာလို႔ရေအာင္ MTK Preloader Drivers
ထည့္သြင္းနည္းကိုေအာက္ကလင့္မွာေလ့လာၾကည့္ပါ
MT65xx Preloader Driver ကို Install ျပဳလုပ္နည္း
ဖုန္းမွာ USB Debugging ကို Enable ျပဳလုပ္ထားပါ။
ဖုန္းနဲ႔ကြန္ပ်ဴတာကိုခ်ိတ္ဆက္လိုက္ပါ ကြန္ပ်ဴတာကဖုန္းကိုသိၿပီဆိုတာနဲ႔
Windows Command Prompt ကိုဖြင့္လိုက္ပါ W+R ကိုတြဲႏွိပ္ၿပီး
Run Box တြင္ CMD လို႔ရိုက္ထည့္ၿပီး Enter ေခါက္လိုက္ပါ။
Command Box ပြင့္လာတဲ့အခါ ေအာက္ပါစာသားကို
မွန္ေအာင္ရို္ကထည့္ၿပီး Enter ကိုတစ္ခ်က္ေခါက္ေပးလိုက္ပါ။
adb reboot bootloader
Fastboot mode တြင္ ေအာက္ပါစာသားကိုထပ္ရိုက္ထည့္ Enter ေခါက္
fastboot devices
တကယ္လို႔ ADB Devices အဆင္မေျပဘူးဆိုရင္ေတာ့ USB Driver ကိုျပန္လည္စီစစ္ၾကည့္ပါ
Devices သိၿပီဆိုရင္ေတာ့ ေအာက္ပါစာသားကိုထပ္ရိုက္ထည့္ၿပီး Enter ကိုေခါက္ပါ။
fastboot oem unlock
Unlocking ျပဳလုပ္ေနတုန္းခနေစာင့္ေနလိုက္ပါ အားလံုးၿပီးသြားရင္ေတာ့
ေအာက္ပါစာသားကိုရိုက္ထည့္ၿပီး ဖုန္းကို Reboot ခ်လုိက္ပါ။
fastboot reboot
Install TWRP Recovery
================
ဒီတစ္ခါ TWRP Recovery ထည့္သြင္းရန္ လိုအပ္တာမ်ားကို
ေအာက္မွာေဒါင္းေလာ့ရယူလိုက္ပါ
Download SP Flash Tool Zip
Download Here MT6735-Android-Scatter.txt file
Download Here BETA-SuperSU-v2.52.zip
ေဒါင္းေလာ့ရလာတဲ့ Flash Tool ကိုဖြင့္လိုက္ပါ
Scatter File ကိုတစ္ခ်က္ႏွိပ္ၿပီး MT6735-Android-Scatter.txt ေရြးခ်ယ္ပါ
ၿပီးရင္ Recovery ေနရာမွာ အမွန္ျခစ္ေပးၿပီး Flash Tool မွ
Download ဆိုတာကိုႏွိပ္ဖုန္းကိုကြန္ပ်ဴတာျဖင့္ ခ်ိတ္ဆက္လိုက္ပါ
ကြန္ပ်ဴတာကဖုန္းကိုသိၿပီဆိုတာနဲ႔ process တစ္ခု ေရး
သြားပါလိမ့္မယ္ ၿပီးေအာင္ေစာင့္ေနလို္က္ပါ။

အားလံုးၿပီးသြားတဲ့အခါ ေအာက္ပံုအတိုင္း ျမင္ေနရပါလိမ့္မယ္

Install SuperSu.zip
=============
ဖုန္းနဲ႔ကြန္ပ်ဴတာခ်ိတ္ဆက္ထားတာကိုျဖဳတ္လုိက္ပါ (ပါ၀ါကိုလံုး၀မဖြင့္ပါနဲ႔)
SuperSU.zip ဖုိင္ကို SD Card သို႔ထည့္ထားလိုက္ပါ
"Volome Down and Power" တြဲႏွိပ္ၿပီး TWRP Recovery Mode သို႔၀င္လိုက္ပါ။
Volume Down ကေရြးခ်ယ္ၿပီး Volume Up အတည္ျပဳေပးတဲ့ခလုပ္ပါ။
SD Card မွာ SuperSu.zip ဖိုင္ကို Install ျပဳလုပ္လိုက္ပါ။
အားလံုးၿပီးသြားရင္ေတာ့ Reboot System ကိုႏွိပ္ၿပီး Reboot ခ်ေပးလိုက္ပါ
ျပန္တာလာတဲ့အခါ သင့္ဖုန္းမွာ Supersu apk ေလးျမင္ေနရပါလိမ့္မယ္
Root access ကိုေတာ့ Root Checker ျဖစ့္စမ္းသပ္ၾကည့္လိုက္ပါ။
အဆင္ေျပပါေစ
ဇူးနစ္(နည္းပညာ)


0 Comments
You are welcome to share your ideas with us in comments! (မှတ်ချက်များပေးရာတွင် သင်၏အကြံဉာဏ်များကို ကျွနိုပ်တို့နှင့် မျှဝေရန် ကြိုဆိုပါသည်။)
Emoji